

- 日期:2026-08-28
- 分類:企業
Screws Won't Tighten, Keep Spinning, or Come Loose? Do These 3 Things First
When screws refuse to tighten, spin endlessly, loosen after installation, or become difficult to remove, the problem is not always the screw itself. The cause may be a stripped drive recess, damaged threads, an oversized pilot hole, the wrong screw type, weak material around the hole, or incorrect installation technique. Before forcing the screw with more torque, identify what is actually failing. Applying more force to the wrong problem can damage the screw head, enlarge the hole, crack the surrounding material, or make later removal much more difficult.
Do these 3 things first:
- Stop adding torque. If the screw is spinning, slipping, or deforming, additional force may make the damage worse.
- Inspect the screw and the hole separately. Determine whether the drive recess, screw threads, anchor, or surrounding material has failed.
- Confirm that the screw is correct for the material. Wood screws, machine screws, self-tapping screws, masonry fasteners, and drywall screws are designed for different applications.
A screw that will not tighten is usually giving you useful information. If the head turns but the screw does not move deeper, the threads may no longer be gripping. If the driver slips out of the recess, the bit may be incorrect or the head may already be stripped. If the screw enters at an angle or suddenly becomes difficult to turn, the pilot hole, thread alignment, or material hardness may be the problem. Understanding these differences is the fastest way to choose an appropriate repair.
Common Screw Problems and Causes: How to Identify What Went Wrong
The same visible symptom can have several different causes. For example, a spinning screw may indicate damaged screw threads, stripped internal threads, a loose wall anchor, or a hole that has become too large. Use the following table to narrow down the likely cause before attempting a repair.
| Cause | How to Identify It | Recommended Action |
|---|---|---|
| Stripped screw head | The driver slips or rotates without gripping the recess securely. | Stop using the damaged recess and switch to an appropriate removal method. |
| Stripped hole in wood | The screw turns but never becomes tight, and wood fibers may be visible around the hole. | Repair the hole or move to a sound fastening location where appropriate. |
| Damaged machine threads | A machine screw binds, spins, or cannot reach proper clamping force. | Inspect both male and female threads and replace or professionally repair damaged threaded parts. |
| Wrong driver bit | The bit feels loose, rocks inside the recess, or repeatedly cams out. | Use the exact drive type and correct bit size before continuing. |
| Pilot hole too large | The screw enters very easily but develops little holding force. | Repair the hole or select an approved fastening method for that material. |
| Pilot hole too small | Installation requires unusually high torque or the material begins splitting. | Stop and verify the recommended pilot-hole diameter for the screw and material. |
| Loose wall anchor | The anchor rotates together with the screw or pulls away from the wall. | Replace the anchor with a properly sized type suitable for the wall and load. |
| Wrong screw for the material | Poor grip, broken screws, excessive resistance, or frequent loosening occurs. | Select a screw designed for the substrate, load, environment, and installation method. |
| Overtightening | The screw initially tightens, then suddenly becomes loose or the head snaps. | Replace damaged components and use controlled torque during reinstallation. |
Step-by-Step Screw Troubleshooting Process
Step 1: Identify the Symptom Before Touching the Screw Again
Start by describing exactly what the screw is doing. Does the driver slip? Does the screw rotate without moving inward or outward? Does it become extremely tight halfway in? Does it repeatedly loosen after use? Does the anchor rotate behind the screw? These symptoms point to different failures, so the first diagnostic step is simply to observe the behavior without applying additional force.
Also inspect the surrounding material. Cracks around a wooden fastener, crumbling drywall, enlarged holes, corrosion around metal screws, or movement between two joined components can provide important clues. A screw is part of a fastening system, and the failure may be in the substrate rather than the fastener.
Step 2: Confirm the Screw Drive and Driver Bit Match
Before assuming that the screw head is stripped, make sure you are using the correct driver. Phillips, Pozidriv, Torx, hex socket, square drive, slotted, and other screw drives may look similar at first glance, but they require matching tools. Even within the same drive family, an undersized or oversized bit can damage the recess.
A correctly fitted bit should seat deeply and remain stable when light pressure is applied. If it rocks significantly or only touches the upper edges of the recess, do not continue. Repeated cam-out can turn a small installation problem into a stripped-head removal problem.
Step 3: Inspect the Screw Head and Threads
If possible, remove the screw and examine it under good lighting. Look for rounded drive edges, flattened or torn threads, corrosion, bending, cracks, or a damaged tip. A fastener with visibly damaged threads should usually be replaced rather than reused, especially when the connection is expected to support repeated loads.
If the screw itself appears normal but still will not tighten, inspect the receiving hole or internal thread. In many cases, the screw is simply revealing that the material around it no longer provides sufficient grip.
Step 4: Check the Hole, Anchor, or Female Thread
For wood, check whether the hole has become enlarged or the fibers have been crushed. For drywall, inspect the anchor rather than focusing only on the screw. For machine screws, inspect the threaded nut, insert, tapped hole, or receiving component. If the receiving thread is damaged, installing a new screw of the same size may not solve the problem.
Do not automatically replace a loose screw with a much larger screw. Increasing diameter or length without checking the available material can split wood, damage hidden components, penetrate wiring or plumbing, or weaken the connection in another way.
Step 5: Verify Screw Diameter, Length, and Thread Type
The correct screw must match more than the visible hole. Diameter affects holding strength and material removal, while length determines how much usable material the threads engage. Thread geometry also matters. Coarse threads are often selected for some softer materials, while machine threads are intended to mate with compatible internal threads.
If replacing an existing screw, compare the original diameter, thread pattern, length, head style, and drive type. For engineered equipment, furniture systems, machinery, vehicles, structural connections, or manufacturer-specified assemblies, follow the specified fastener requirements rather than substituting by appearance alone.
Step 6: Check Alignment and Pilot-Hole Size
A screw entering at an angle may bind even when the screw and hole are both undamaged. Misalignment can also cause cross-threading in metal components. If a machine screw becomes difficult to turn almost immediately, do not force it. Back it out and confirm that it is entering squarely and that the threads are properly aligned.
For materials that require pilot holes, the hole diameter should be appropriate for the screw and substrate. A hole that is too small can create excessive installation torque or splitting. A hole that is too large may provide insufficient thread engagement. When specifications are available, use the manufacturer's recommended drilling dimensions.
Step 7: Reinstall With Controlled Torque
More torque does not automatically produce a stronger connection. Once the screw has seated and achieved the necessary clamping force, additional tightening may strip the receiving material, damage the screw, deform the workpiece, or crush softer substrates. This is particularly important with small screws, plastic components, sheet metal, furniture hardware, and threaded inserts.
For torque-critical applications, use the manufacturer's specified torque value and an appropriate torque-controlled tool. Guessing by feel is not appropriate for safety-critical or engineered joints.
Step 8: Test the Connection Instead of Assuming It Is Fixed
After repair, check whether the joined parts remain stable under their normal intended use. Look for movement, gap formation, recurring loosening, unusual noise, or the screw backing out again. A screw that repeatedly loosens may indicate vibration, inadequate clamping force, damaged threads, an unsuitable fastener, or movement within the joint.
If the same screw continues to fail after a reasonable repair, treat the repeated failure as a symptom rather than simply tightening it again. The underlying joint design, substrate, vibration, or loading condition may require professional evaluation.
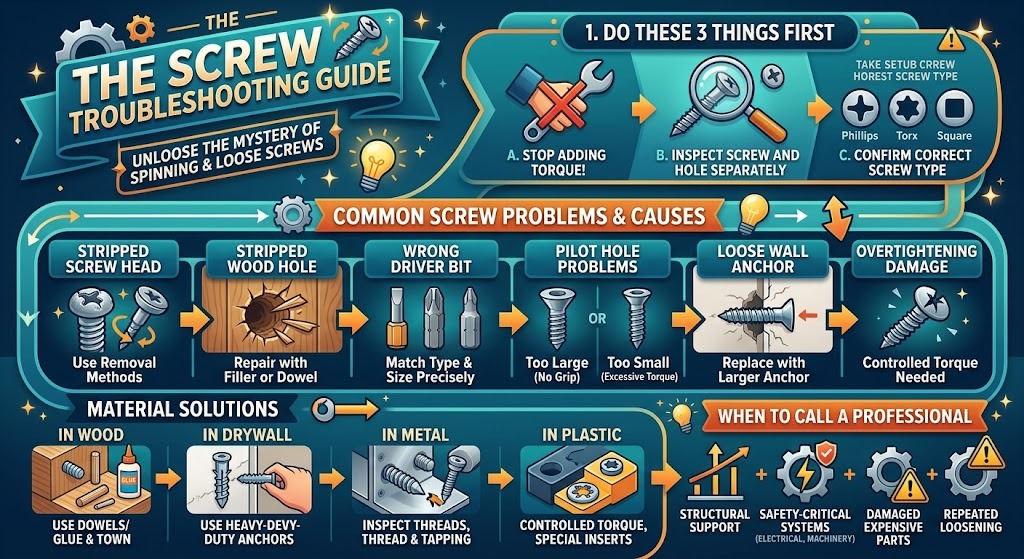
How Material Changes the Correct Fix for Screws
There is no universal repair for loose screws because the correct approach depends heavily on the material receiving the fastener. A repair that works in solid wood may be inappropriate for drywall, thin sheet metal, plastic, concrete, or a threaded machine component.
Screws in Wood
Wood screws depend on sound wood fibers for holding power. If a screw has been overtightened or repeatedly removed and installed, the hole can become enlarged and lose grip. Before repairing it, inspect whether the wood itself is cracked, rotten, water-damaged, or too thin to provide reliable thread engagement. Cosmetic furniture repairs and structural wood connections should not automatically be treated the same way.
Screws in Drywall
Drywall alone provides limited holding capacity. Many wall-mounted items therefore rely on anchors, studs, or other approved fastening systems. If an anchor spins in place, simply tightening harder usually makes the hole larger. The appropriate repair depends on the wall construction and the load being supported.
Machine Screws and Metal Threads
Machine screws are designed to mate with defined internal threads. If the screw turns without tightening, either the external or internal threads may be damaged. If the screw becomes tight immediately and does not advance normally, cross-threading is possible. Do not force the connection, because damage to the receiving threaded component may be more expensive than replacing the screw.
Screws in Plastic
Plastic is especially vulnerable to overtightening. Excessive torque can strip molded threads, crack bosses, deform the component, or damage threaded inserts. When working on electronic enclosures, appliances, automotive trim, or similar products, use the specified fastener and avoid assuming that a larger screw is a safe repair.
Masonry and Concrete Fasteners
Fastening into concrete, brick, or masonry requires a system designed for that substrate. Hole diameter, embedment depth, anchor type, edge distance, substrate condition, and load can all affect performance. For heavy loads, overhead installations, guardrails, structural attachments, or other safety-critical applications, use an engineered or manufacturer-approved fastening method rather than improvising a repair.
When Should You Stop and Call a Professional?
Many ordinary screw problems in furniture, cabinets, household accessories, and non-critical assemblies can be diagnosed visually. However, some fasteners are part of systems where failure could cause injury, property damage, water leaks, electrical hazards, or structural instability. In these situations, trial-and-error fastening is not appropriate.
Professional inspection is recommended when:
- The screw is part of a structural connection, railing, stair system, ceiling installation, or load-bearing assembly.
- The fastener supports a heavy object or an overhead load.
- The screw is part of electrical equipment, a vehicle, machinery, gas equipment, plumbing, or another safety-critical system.
- The surrounding wood, metal, masonry, or plastic is cracked, corroded, deformed, or otherwise damaged.
- Threads inside an expensive or non-replaceable component have been stripped.
- A fastener repeatedly loosens even after correct installation.
- You are unsure what is behind a wall, panel, floor, or ceiling before using a longer screw.
- The manufacturer specifies a particular fastener, installation procedure, or torque requirement that cannot be verified.
How to Prevent Screw Problems Before They Start
Most screw failures are easier to prevent than repair. Correct selection and installation reduce stripped heads, damaged holes, broken fasteners, loose joints, and wasted time. Whether you are assembling furniture, installing hardware, fastening metal components, or completing general maintenance, a few basic practices make a major difference.
- Use the correct screw type. Select the fastener according to substrate, load, environment, and manufacturer recommendations.
- Match the driver exactly. A poor-fitting bit is one of the fastest ways to damage a screw head.
- Drill the correct pilot hole when required. Avoid guessing the diameter if specifications are available.
- Keep the screw aligned. Starting at an angle can damage both the screw and the receiving thread.
- Avoid excessive torque. Tight is not the same as stronger.
- Do not repeatedly reuse damaged screws. Deformed heads or threads increase the risk of installation and removal problems.
- Check corrosion resistance. Outdoor, damp, coastal, chemical, and other exposed environments may require appropriate fastener materials or coatings.
- Inspect high-use joints periodically. Hinges, brackets, handles, machinery covers, and vibrating assemblies may reveal loosening before a complete failure occurs.
The main principle is simple: screws should be selected as part of a fastening system, not as isolated pieces of hardware. The screw, receiving material, hole, anchor or nut, load, environment, and installation torque all work together. When one part of that system is incompatible, simply tightening harder rarely provides a lasting solution.
Screws FAQ: 10 Common Questions
Q1: Why does a screw keep spinning without getting tight?
A screw that keeps spinning usually means the threads are no longer gripping the receiving material. The hole may be stripped, the internal thread may be damaged, or an anchor may be rotating with the screw. Inspect the screw and receiving material separately before choosing a repair.
Q2: Why does my screwdriver keep slipping out of the screw?
The driver bit may be the wrong type or size, the bit may be worn, or the screw recess may already be damaged. Stop before the head becomes completely stripped and confirm that the driver fits the screw correctly.
Q3: Can I use a larger screw when the original hole is stripped?
Sometimes a different fastener may be appropriate, but automatically installing a larger screw is not always safe. The available material, edge distance, thickness, load, and hidden utilities should be considered before increasing screw diameter or length.
Q4: Why do screws keep coming loose after I tighten them?
Repeated loosening may result from vibration, movement in the joint, inadequate thread engagement, damaged threads, improper clamping force, or an unsuitable screw. Repeatedly tightening the same screw may not address the underlying cause.
Q5: How can I tell whether a screw head is stripped?
A stripped screw head usually has rounded, flattened, or deformed drive surfaces. The correct bit may no longer seat securely and may rotate or slip without transferring enough torque to the screw.
Q6: Should I drill a pilot hole before installing screws?
It depends on the screw and material. Pilot holes can reduce splitting, improve alignment, and control installation torque in many applications. When the screw manufacturer specifies a pilot-hole diameter, follow that recommendation.
Q7: Why does a screw become very hard to turn halfway in?
Possible causes include a pilot hole that is too small, dense material, misalignment, cross-threading, debris in the hole, or the wrong screw type. Stop rather than forcing the screw until the cause is identified.
Q8: Can screws be reused?
Some undamaged screws may be reusable in non-critical applications, but screws with damaged threads, corrosion, bending, cracks, or stripped drive recesses should generally be replaced. Safety-critical fasteners should follow manufacturer requirements.
Q9: Does tightening a screw harder make the connection stronger?
Not necessarily. Excessive torque can strip threads, crush the material, distort components, or break the screw. Proper clamping force and the correct torque are more important than simply tightening as hard as possible.
Q10: When should a screw problem be handled by a professional?
Professional help is recommended when screws are part of structural, electrical, automotive, machinery, plumbing, overhead, heavy-load, or other safety-critical systems, or when the receiving material or threaded component is seriously damaged.
社交媒體